
A Natural Face Lift? Jade Rollers, Gua Sha, T-Bars & More

A Natural Face Lift? Jade Rollers, Gua Sha, T-Bars & More
You’ve seen them everywhere, but have you ever wondered whether massage tools actually provide face-lifting results that last? In particular, jade rollers, gua sha tools, T-bar tools and 3D Face rollers are popular with both professionals and beauty trend followers alike, but the question is: What do these facial tools do, and do they even work? Read on to learn about these skin-enhancing tools, how to use them and the numerous benefits they provide — from facial massage and lifting to lymphatic drainage and skin plumping.
Jade Rollers & Gua Sha | Tutorial: Gua Sha & Jade Roller | 3D Face Rollers & T-Bar Tools | Tutorial: 3D Face Rollers & T-Bar Tools
What Are Jade Rollers & Gua Sha Tools?
Jade rollers and gua sha are are tools that date back to seventh century China. They have been used for hundreds of years to help ease facial tension, reduce eye puffiness and improve lymphatic flow (aka moving stagnant waste fluids away from a tense or puffy area to be expelled from the body using massage and gentle pressure). These days, gua sha tools are commonly made of jade, as well as other high quality, pure and natural stones like rose quartz, green aventurine and amethyst, as well as other materials that are cooling and smooth against the skin like stainless steel and porcelain. The gua sha tool has been used in traditional Chinese medicine for hundreds of years for the aforementioned therapeutic benefits, as well as more recently for cosmetic benefits such as contouring and lifting the face and plumping the lips.
A jade roller is another face-lifting device that dates back to ancient China. Commonly made of jade — though they can be made from other stones as well — these tools are very accessible and easy to use. Simply move the natural face lift tool to the point on the face or neck you want to massage and roll it along the area. Several passes in one spot (under your eye toward your temple, for example) can help achieve the benefits. In comparison, gua sha requires more technique, so we’ve mapped out the steps below so you can learn which tool is best for you and how to get the most out of it.
Prepare Your Skin To Use A Gua Sha At Home
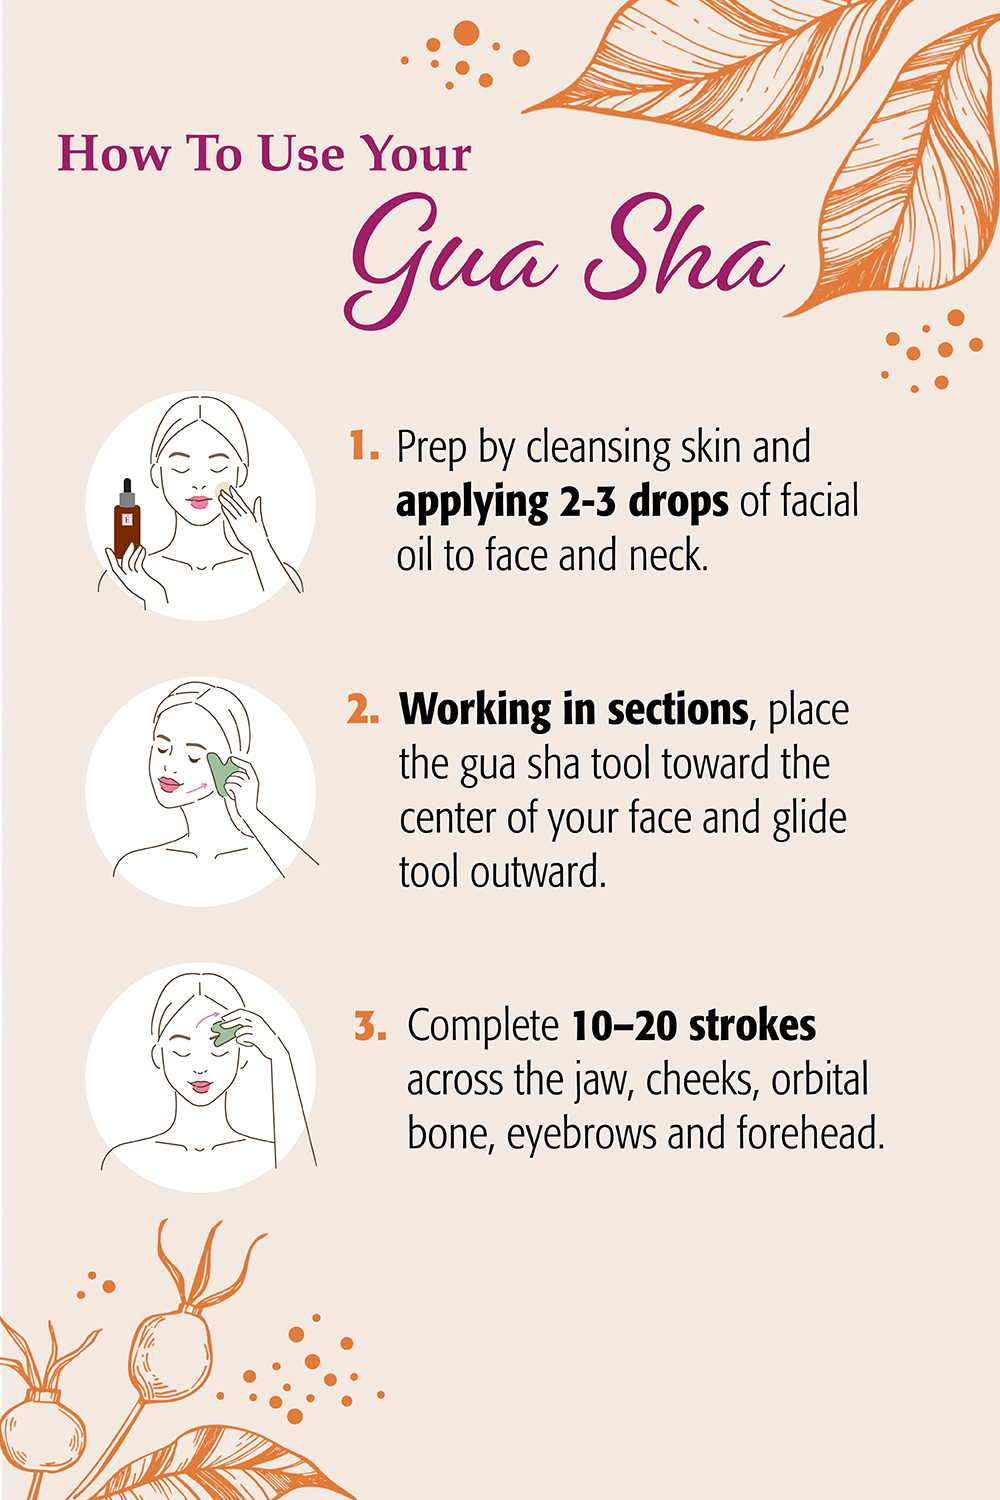
Before starting, prep the skin by applying a facial oil on the areas you want to massage, like your face and neck. Use a generous amount of oil, warming it up in your palms before pressing it into your skin. The Rosehip Triple C+E Firming Oil is a great choice for facial massage — it provides the “glide” you’ll need while also smoothing the appearance of fine lines and wrinkles with essential fatty acids that improve the look of the skin’s texture. One happy customer, Lali P., reviewed the oil online saying: “Rosehip Firming Oil is one of my favs! Packed with great vitamins, it smooths and repairs the skin, making it look glowing and healthy.”
Another luxurious option is our Facial Recovery Oil, which is suitable for all skin types. Often referred to as “liquid gold” by our customers, this formula contains clary sage oil, olive oil and sage leaf extract, which improve the look of the skin while providing deep hydration. For a soft and bright complexion, the Camellia Glow Solid Face Oil with pink tourmaline gemstones is another highly moisturizing oil option. Marula oil and hemp seed oil hydrate the skin so that it appears smooth and supple.
Product picks first
Camellia Glow Solid Face Oil Rosehip Triple C+E Firming Oil
Body second
Tutorial: How To Use Your Gua Sha & Jade Roller
You can learn to use these tools in the comfort of your own home by performing a self-guided face massage.
For The Jawline
To release any facial tension along your jaw and cheek area, glide your jade roller or gua sha tool along the jawline and across the cheeks. The gua sha tool might look a little more tricky to use because of its shape, so simply use the wider part to glide up from the base of the jawline to the top of the cheekbone. Repeat roughly five times on the first spot and then do the same on the other side of the face. You’re likely to feel relaxed, so you’re welcome to continue applying pressure for as long as you’re comfortable. Getting blood flowing is the ultimate goal, so if it feels good, keep going!
For The Neck
Many people experience neck strain thanks to office jobs and from too much time staring down at handheld devices. To help ease that tension, hold the tool of choice at an angle on your neck and slowly move up from the bottom of your neck (by your collarbone) toward your jawline. To help lymphatic drainage, work the tool from the ear all the way down the neck to the collarbone. Repeat until you feel tension release. The purpose of these repeated movements is to stimulate blood flow and relieve tightness in your neck.
For Puffy Eyes
To assist with puffiness around the eyes, gently glide the tool across the undereye area up to the temple until you reach the hairline. As with all of these techniques, repeat five to eight times, or until you feel relaxed. You can also cool the gua sha and jade roller in the freezer for a few minutes before you slide it over the area to further help reduce puffiness, swelling and inflammation.
For The Forehead
Now it’s time to move onto the forehead. For the gua sha tool, place the narrow end of the stone between the brow bone and the eyebrow and sweep from your eyebrows up until your hairline. Do the same for the jade roller, gliding through from the corner of your eye to the temple to relieve the tension in the forehead. You can hold the tools still with some pressure on spots of tension before sweeping up to the hairline too.
For further instruction on all these techniques, watch our Lead Skin Care Trainer Natalie Pergar demonstrate a facial gua sha and jade rolling tutorial. .
3D Face Rollers & T-Bar Tools
The 3D face roller and the T-bar are innovative tools designed for enhancing facial contouring and skin tightness through massage. These tools are gaining popularity due to their ability to define facial contours and improve the look of skin elasticity.
3D face rollers have a Y-shaped design with two small balls that rotate 360 degrees. This allows the roller to adapt to the contours of the face as it can reach multiple angles and areas efficiently. It utilizes the rolling motion to lift and firm the look of the skin, enhancing facial contours and promoting lymphatic drainage.
A T-bar unsurprisingly has a T-shaped design with a static bar that may vibrate depending on the model. The vibration helps to stimulate the skin and muscles but does not offer the same range of motion as the 3D roller.
Tutorial: How To Use 3D Face Rollers & T-Bar Tools At Home
3D Face Roller Tutorial
Begin with a clean, slightly dry face to enhance grip and contouring effects. Start from the center of the face and roll outwards, using firmer pressure upward and lighter pressure downward. Focus on lymphatic drainage by starting at the chest area and moving upwards towards the face, using a rhythm of three (harder pressure out, lighter back in). Move to the clavicle and above the collarbone, opening up these areas before progressing to the face.
For facial application, start at the center of the chin and roll straight up to the jaw, then move to the neck, positioning the roller on either side of the neck up to the ear, avoiding the central thyroid area for comfort. The roller is designed to grip the skin and muscles effectively, enhancing the lifting effect during the upward motion.
T-Bar Tutorial
The T-Bar may include a vibration feature which aids in the massaging process and can enhance circulation. Begin usage by cleansing the skin thoroughly; the tool can be used after applying a facial mask and before moisturizers for optimal results. Use the tool by starting at the center of the chest and moving towards the underarm, then upward across the neck and face. The application involves lifting motions from the center of the face outward and upward, adjusting the pressure accordingly. Focus on areas that need contouring or tension relief, such as between the eyebrows, across the forehead and around the lips for plumping effects. Finish by moving the tool across the forehead and the upper parts of the brows, maintaining a rhythmical and gentle motion to ensure comprehensive coverage.
Both tools are used to enhance facial features and improve skin texture, making them valuable additions to a skin care routine. Watch both tutorials in the video below if you’d like to follow along with Natalie as she takes you through the process step-by-step.
Have you tried using these facial techniques and reaped the benefits? Let us know in the comments below or on social media! Or visit your nearest Eminence Organics Spa Partner and book an appointment!
—————
Boost Internet Speed–
Free Business Hosting–
Free Email Account–
Dropcatch–
Free Secure Email–
Secure Email–
Cheap VOIP Calls–
Free Hosting–
Boost Inflight Wifi–
Premium Domains–
Free Domains